 Free Same-Day Click & Collect
 Next Day Delivery Gifts
 Get more time to pay.*
 Menkind Discount Codes
Drone Troubleshooting Guide
The Sky's The Limit
Welcome to the world of drone flying where the sky is quite literally the limit. This guide will help you with the tips and tricks we've learnt along the way from a lot of years of drone flying, and to explain some of the jargon and technical terms you might find in instruction guides or on websites. The good news is that RC drones are becoming easier and easier to control with each new model, and there really is some amazing technology that makes flying these gadgets lots of fun. If you've not quite started your journey yet, you can find our fuill range of currently available drone models here.
The Best Advice We Could Ever Give Is...
We totally get it. You've just bought your brand new drone and the only thoughts on your mind are how high you can get it, how fast you can go, and what totally awesome tricks you can pull of mid flight! Well, at the risk of sounding like party poopers, that's not going to happen. Not right away anyway. You will get there but first there is something waaay more important. The greatest piece of advice we could ever give... Read the instructions! So before you file this guide under B for Bin or D for Disappointed, we know that's the most boring answer you would ever want, but we can't stress enough how much it will potentially save you from huge frustration - not to mention how much it may also save you from having to spend more cash on potential repairs. Don't worry if not all of the instructions make sense: that's exactly what this guide is for!
Syncing
The first thing you need to do is sync the drone with the controller (we're assuming you know how to put batteries in, right?). This can differ from drone to drone, but it's normally the following procedure:
- Turn both the drone and the remote on. You might find that all the drone's lights are flashing like Blackpool Illuminations but that's quite normal!
- Move the left hand stick from its lowest position, right up to the top, then straight back down again.
- If your command has worked, the drone lights should no longer flash and you should have heard a satisfying beep! You've just synced!
- Some of the more advanced drones with GPS might need calibrating first. Best to check the instructions if this is the case.
Don't Fly Before You Can Hover
Wise man once say, "to fly a drone, you must hover before you can fly." It's probably going to take you a few attempts just to get the drone off the ground, but these next tips should help.
If you give the drone too much power, it's going to go straight up, whack off the ceiling and come straight back down just as quickly. Too little power and you are going to get tubulence from the drone being too close to the ground, so it's going to be very hard to control.
Menkind Super Tip No. 1: Move the left hand stick (throttle) up to just under half way.
All drones are different (you'll hear us say that a lot!) but that's a good starting point. Ideally you want the drone up to head height. It's easier to look at and can be lowered quickly if needed.
Menkind Super Tip No. 2 is don't touch anything else! Watch what the drone does. If you find the drone goes off in a directions, that's actually quite normal. You might need to adjust the Trim settings to compensate (don't worry - we'll cover that in a sec!). The drone might require a fair amount of initial trimming as all drones vary. in which case it might be rapidly heading off in one direction. Lower the left hand stick (throttle) slowly until it reaches the bottom again.
Menkind Super Tip No. 3: Try not to panic - easier said than done, we know - but for example if you immediately cut the power on the left hand stick the drone is just going to drop. Try to lower it as gently as possible. Obviously in an emergency (ie heading at pace towards a wall, or Grandma's head) just cut the power.
A Drone With All The Trimmings
It's perfectly normal to have to trim a drone at some point during its flight, and that's why all drones have trim adjustments on them. Check your instructions to find yours. Most need a little adjustment right after take off and some need a little adjusting as the drone starts to lose power as it runs out of battery.
Most controllers have 4 trims: forwards, backwards, left and right.
<jargon busting> Forwards and backwards are also known as Pitch, so your instructions might refer to pitch trims. Left and right are also known as Roll; again, your manual might refer to roll trims.
If your drone is naturally drifting to the left, you will need to compensate by using the 'right adjustment trim'. Each time you press it you usually hear a beep. If you keep pressing the trim button, you should start to see the drone stop drifting. Likewise if the drone is drifting forwards then use the backwards trim, drifting backwards use the forwards trim, and finally use the left trim if it's drifting right.
Menkind Super Tip No. 4: The drone doesn't have to be up in the air flying to adjust the trim. As long as the controller is still connected to the drone (synced) then you can adjust the trim settings. This is really handy to know if the drone needs a lot of trimming. Simply land the drone, make your adjustments, then take off again to see if it's more stable. Rinse and repeat until you are happy you have the control.
Trimming is a critical part of flying a drone so always read your instructions to find out where the controls are to do this!
Menkind Super Tip No. 5: Practise, practise, practise your take off and hover. Just keep doing it. It may not sound like the most exciting flying, but once you've mastered this you are already halfway to being a pro. Drone flying is all about being in control.
Control
Most drones these days are 4 channel. But what does that mean? Basically it's referencing the directions the drone can go in. Let's count them: up or down make up the first channel. Left and right are the second channel, and forwards or backwards are the third channel. The fourth is a little harder to explain but it means the rotation of the drone, as it can turn/rotate without actually moving.
Menkind Super Tip No. 6: To start with, completely ignore the 4th channel. You can fly a drone no problem without it by just using the other channels.

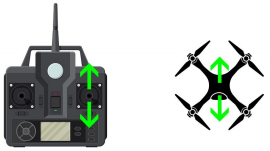
First channel: The left hand stick when pushed up or down adjusts the height of the drone. This is also referred to as the throttle.
Second channel: If you push the right hand stick either up or down, the drone will fly forwards or backwards. This is also known as the pitch. If you imagine the picture of the drone is a bird's eye view you should get the idea.
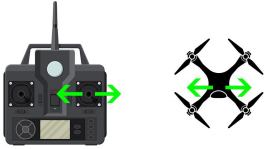
Third channel: The right hand stick also controls the sideways movement of the drone. This (unsurprisingly!) also a has a fancy name, which is roll.

Fourth channel: Back to the left hand stick and the final channel. This rotates the drone (also called yaw) and, depending on which way you push the stick, results in the rotation of the drone being one way or the other.
Push the stick right and the drone will rotate in a clockwise directior. However, push the stick to the left and the drone will rotate in a counter clockwise direction. As we mentioned previously, whilst learning you can forget about this channel to make things simpler!
Handy Things to Know!
Blades not spinning? You might not believe this, but one of the most common reasons for a rotor not spinning is trapped hair! If you have a family pet (or just a particularly hairy family member!) you might find that over time hair can become trapped around the motor, which prevents it from spinning. Most blades pop off very easily so it's a super easy problem to fix. Some drones come with little u-wrenches to help pop them off.
Some drones have the blades screwed in place too, so just be aware how they're attached. You'll be amazed at how many drones we get back where this has been the problem!
If you have just replaced your blades, be careful you haven't put your brand spanking new ones on too firmly, as this can stop the motors spinning freely (or even at all). Try raising them slightly up their spindes as this could give more room to rotate.
Bent or broken blades? Even the most experiences pilots will crash their drones from time to time. It's easy to get distracted or a little bit over confident. It will also come as no surprise then that just about every drone under the sun comes with a pack of spare blades. Bent and broken blades will hinder your drone's performance so always replace them if they become damaged.
Blades are spinning but the drone won't take off? If you think that all blades are the same, you'd be wrong! The most common reason for a drone not lifting off the floor is due to the blades being on the wrong motor. Check your instructions as there should be diagrams to show you in which order they go on. Some drones have letters printed on them or embossed to help you out.
Drone doesn't last as long as advertised? If your drone charges from the handset, it's very important to realise that cheap batteries are cheap for a reason! If you've just bought 50 batteries for £1, there's a reason for that! We would strongly recommend either Duracell or Fujitsu batteries; take a look at our range online.
If your drone battery charges via USB then make sure you are using the cable and charger provided. We can't stress enough how important this is! Also, rechargeable batteries work best if they are charged regularly. If you have left your drone for quite a while without use then a) why would you do that? and b) it might mean that it loses its ability to charge fully. The solution is a good one though: play with your drone as much as possible!
Here to Help!
If you ever need help or advice with your purchase, you can always drop us an email or give us a call - see our contact page for more information on how to contact us.